自搭 VPS 折腾记录
因为之前有一个Azure的最基础的云服务器,就想着搭一个VPS,一直拖了很久才行动,下面是搭建过程的一些记录。如果作为一个教程看,可以直接跳过不需要的部分,比如升级系统。不过一定要看最后,最后有写我为什么成功后又失败了。
本文所使用的设施
云服务器
-
服务:Azure Standard B1s
1G内存 64G磁盘
-
操作系统:Linux CentOS 7.6
[CentOS]$ cat /etc/redhat-release CentOS Linux release 7.9.2009 (Core) [CentOS]$ uname -r 3.10.0-1160.71.1.el7.x86_64 [CentOS]$ sysctl net.ipv4.tcp_available_congestion_control net.ipv4.tcp_available_congestion_control = cubic reno -
位置:East Asia
-
服务器获取来源:Azure student
说明
凡是以[root]#开头均表示需要以root身份执行命令
各命令的命令行输出不一定相同,大家自行判断是否执行成功
一、配置Google BBR
BBR是Google的一套网络拥塞控制算法,用在VPS服务器上,可以有效减少拥堵丢包,大幅提高网络连接和翻墙速度。大家可自行选择是否需要BBR。
因为CentOS7内核版本较低,没有内置BBR,所以需要升级内核
如果是其他已内置BBR的系统,如Debian 9或更高版本的 Debian Linux,请直接参考这个教程
1. 升级内核
1 升级源
yum update
2 安装elrepo并升级内核:
[root]# rpm --import https://www.elrepo.org/RPM-GPG-KEY-elrepo.org

[root]# rpm -Uvh http://www.elrepo.org/elrepo-release-7.0-2.el7.elrepo.noarch.rpm
Retrieving http://www.elrepo.org/elrepo-release-7.0-2.el7.elrepo.noarch.rpm
Retrieving http://elrepo.org/elrepo-release-7.0-4.el7.elrepo.noarch.rpm
Preparing...                          ################################# [100%]
Updating / installing...
   1:elrepo-release-7.0-4.el7.elrepo  ################################# [100%]

[root]# yum --enablerepo=elrepo-kernel install kernel-ml -y
Loaded plugins: fastestmirror, langpacks, product-id, search-disabled-repos, subscription-manager

This system is not registered with an entitlement server. You can use subscription-manager to register.

Loading mirror speeds from cached hostfile
 * elrepo: mirrors.thzhost.com
 * elrepo-kernel: mirrors.thzhost.com
elrepo                                                                          | 3.0 kB  00:00:00
elrepo-kernel                                                                   | 3.0 kB  00:00:00
(1/2): elrepo/primary_db                                                        | 457 kB  00:00:00
(2/2): elrepo-kernel/primary_db                                                 | 2.1 MB  00:00:00
Resolving Dependencies
--> Running transaction check
---> Package kernel-ml.x86_64 0:6.1.9-1.el7.elrepo will be installed
--> Finished Dependency Resolution

Dependencies Resolved

=======================================================================================================
 Package              Arch              Version                         Repository                Size
=======================================================================================================
Installing:
 kernel-ml            x86_64            6.1.9-1.el7.elrepo              elrepo-kernel             60 M

Transaction Summary
=======================================================================================================
Install  1 Package

Total download size: 60 M
Installed size: 284 M
Downloading packages:
kernel-ml-6.1.9-1.el7.elrepo.x86_64.rpm                                         |  60 MB  00:00:02
Running transaction check
Running transaction test
Transaction test succeeded
Running transaction
Warning: RPMDB altered outside of yum.
  Installing : kernel-ml-6.1.9-1.el7.elrepo.x86_64                                                 1/1
  Verifying  : kernel-ml-6.1.9-1.el7.elrepo.x86_64                                                 1/1

Installed:
  kernel-ml.x86_64 0:6.1.9-1.el7.elrepo

Complete!
3 查看现在的内核
[root]# uname -r
3.10.0-1160.71.1.el7.x86_64
4 更新grub文件并重启
[root]# egrep ^menuentry /etc/grub2.cfg | cut -f 2 -d \'
CentOS Linux (6.1.9-1.el7.elrepo.x86_64) 7 (Core)
CentOS Linux (3.10.0-1160.71.1.el7.x86_64) 7 (Core)
CentOS Linux (3.10.0-957.27.2.el7.x86_64) 7 (Core)
[root]# grub2-set-default 0
[root]# reboot
5 查看内核版本是否以更新
[CentOS]# uname -r
6.1.9-1.el7.elrepo.x86_64
已更新成功
2 开启BBR
1 开启BBR
[root]# vi /etc/sysctl.conf
# 在文件末尾添加如下内容
net.core.default_qdisc = fq
net.ipv4.tcp_congestion_control = bbr
2 加载系统参数
[root]# sysctl -p
net.core.default_qdisc = fq
net.ipv4.tcp_congestion_control = bbr
3 确认BBR已经开启
[root]# sysctl net.ipv4.tcp_available_congestion_control
net.ipv4.tcp_available_congestion_control = reno cubic bbr
[root]# lsmod | grep bbr
tcp_bbr                20480  2
3 配置BBR
[root]# wget https://raw.githubusercontent.com/bannedbook/fanqiang/master/v2ss/server-cfg/sysctl.conf  -O -> /etc/sysctl.conf
[root]# sysctl -p
fs.file-max = 655350
net.core.default_qdisc = fq
net.ipv4.tcp_congestion_control = bbr
二、安装V2ray服务端
1 时间校准
时间需要和PC符合,不然无法使用。
可用date命令查看时间。若时间不一致,搜索修改服务器时间。
2 服务器安装v2ray
直接使用官方安装脚本
[root]# bash <(curl -L https://raw.githubusercontent.com/v2fly/fhs-install-v2ray/master/install-release.sh)
  % Total    % Received % Xferd  Average Speed   Time    Time     Time  Current
                                 Dload  Upload   Total   Spent    Left  Speed
100 22189  100 22189    0     0  42528      0 --:--:-- --:--:-- --:--:-- 42589
info: Installing V2Ray v5.2.1 for x86_64
Downloading V2Ray archive: https://github.com/v2fly/v2ray-core/releases/download/v5.2.1/v2ray-linux-64.zip
  % Total    % Received % Xferd  Average Speed   Time    Time     Time  Current
                                 Dload  Upload   Total   Spent    Left  Speed
  0     0    0     0    0     0      0      0 --:--:-- --:--:-- --:--:--     0
100 11.0M  100 11.0M    0     0  10.9M      0  0:00:01  0:00:01 --:--:-- 10.9M
Downloading verification file for V2Ray archive: https://github.com/v2fly/v2ray-core/releases/download/v5.2.1/v2ray-linux-64.zip.dgst
info: Extract the V2Ray package to /tmp/tmp.WBXwFCQmXY and prepare it for installation.
info: Systemd service files have been installed successfully!
warning: The following are the actual parameters for the v2ray service startup.
warning: Please make sure the configuration file path is correctly set.
~~~~~~~~~~~~~~~~
[Unit]
Description=V2Ray Service
Documentation=https://www.v2fly.org/
After=network.target nss-lookup.target

[Service]
User=nobody
CapabilityBoundingSet=CAP_NET_ADMIN CAP_NET_BIND_SERVICE
AmbientCapabilities=CAP_NET_ADMIN CAP_NET_BIND_SERVICE
NoNewPrivileges=true
ExecStart=/usr/local/bin/v2ray run -config /usr/local/etc/v2ray/config.json
Restart=on-failure
RestartPreventExitStatus=23

[Install]
WantedBy=multi-user.target
# In case you have a good reason to do so, duplicate this file in the same directory and make your customizes there.
# Or all changes you made will be lost!  # Refer: https://www.freedesktop.org/software/systemd/man/systemd.unit.html
[Service]
ExecStart=
ExecStart=/usr/local/bin/v2ray run -config /usr/local/etc/v2ray/config.json
~~~~~~~~~~~~~~~~
warning: The systemd version on the current operating system is too low.
warning: Please consider to upgrade the systemd or the operating system.

installed: /usr/local/bin/v2ray
installed: /usr/local/share/v2ray/geoip.dat
installed: /usr/local/share/v2ray/geosite.dat
installed: /usr/local/etc/v2ray/config.json
installed: /var/log/v2ray/
installed: /var/log/v2ray/access.log
installed: /var/log/v2ray/error.log
installed: /etc/systemd/system/v2ray.service
installed: /etc/systemd/system/v2ray@.service
removed: /tmp/tmp.WBXwFCQmXY
info: V2Ray v5.2.1 is installed.
You may need to execute a command to remove dependent software: yum remove curl unzip
Please execute the command: systemctl enable v2ray; systemctl start v2ray
试运行
安装完之后,使用以下命令启动 V2Ray:
[root]# systemctl start v2ray在首次安装完成之后,V2Ray 不会自动启动,需要手动运行上述启动命令。
设置开机自启动 V2Ray:
[root]# systemctl enable v2ray
Created symlink from /etc/systemd/system/multi-user.target.wants/v2ray.service to /etc/systemd/system/v2ray.service.
接下来看看 V2ray 是不是真的运行起来了:
[root]# systemctl status v2ray
● v2ray.service - V2Ray Service
   Loaded: loaded (/etc/systemd/system/v2ray.service; enabled; vendor preset: disabled)
  Drop-In: /etc/systemd/system/v2ray.service.d
           └─10-donot_touch_single_conf.conf
   Active: active (running) since Mon 2023-02-06 14:25:37 CST; 51s ago
     Docs: https://www.v2fly.org/
 Main PID: 2354 (v2ray)
   CGroup: /system.slice/v2ray.service
           └─2354 /usr/local/bin/v2ray run -config /usr/local/etc/v2ray/config.json

Feb 06 14:25:37 hachaos systemd[1]: Started V2Ray Service.
Feb 06 14:25:37 hachaos v2ray[2354]: V2Ray 5.2.1 (V2Fly, a community-driven edition of V2Ray.) C...d64)
Feb 06 14:25:37 hachaos v2ray[2354]: A unified platform for anti-censorship.
Feb 06 14:25:37 hachaos v2ray[2354]: 2023/02/06 14:25:37 [Warning] V2Ray 5.2.1 started
Hint: Some lines were ellipsized, use -l to show in full.
看到类似于这样的提示就算启动成功了。
但是由于此时还没有配置V2Ray,所以先关掉:
[root]# systemctl stop v2ray3 配置V2Ray
配置文件
[root]# vi /usr/local/etc/v2ray/config.json写入下列内容
{
  "inbounds": [{
    "port": 10086, // 服务器监听端口,自行修改
    "protocol": "vmess",
    "settings": {
      "clients": [{
        "id": "b831381d-6324-4d53-ad4f-8cda48b30811", //uuid, 自行修改
        "alterId": 64
         }]
    }
  }],
  "outbounds": [{
    "protocol": "freedom",
    "settings": {}
  }]
}修改配置文件中的port,数字随意,建议四位或五位数;
接着修改id,这个id是指UUID,好比账号密码,要获取UUID可以去这个 UUID Generator 网站,每次刷新网页会随机生成一个UUID;
# 测试配置文件
[root]# /usr/local/bin/v2ray test -config /usr/local/etc/v2ray/config.json
V2Ray 5.2.1 (V2Fly, a community-driven edition of V2Ray.) Custom (go1.19.4 linux/amd64)
A unified platform for anti-censorship.
Configuration OK.
输出这样就表示配置文件没有问题。
接下来启动V2Ray
service v2ray start
开放端口
根据配置文件自己设置的端口,在服务器内或服务器管理网站开放相应端口。
V2Ray常用命令:
#启动 V2Ray
service v2ray start
#暂停 V2Ray
service v2ray stop
#查看 V2Ray 状态
service v2ray status
#重启 V2Ray
service v2ray restart
#重装 V2Ray
service v2ray reload
#强制重装 V2Ray
service v2ray force-reload
4 安装配置V2Ray客户端(MacOS)
网上大多都是windows教程,所以这里重点写一下macOS教程
下载客户端软件
我选择的是Qv2ray作为图形界面客户端。直接在GitHub上找到最新release下载macOS版本即可
配置电脑与客户端
Qv2ray只是一个图形界面客户端,我们依然需要自行在电脑上下载v2ray即v2ray-core,它的官方下载教程在这里,但是我安装时电脑的行为与官方教程上有些不同,下面是我的下载过程:
1 homebrew包管理器安装v2ray
如果没有homebrew,请先安装homebrew,其官网有安装命令
有homebrew后,命令行运行brew install v2ray
查看是否安装成功并获取安装路径:
$ where v2ray
/opt/homebrew/bin/v2ray
得到如上返回就说明已经成功安装v2ray,同时记录下改路径,后面会用到。
我用的是zsh,直接有where命令,如果没有where命令,可以使用其他命令
2 下载资源文件
官方教程在这里说“随命令一起下载的 geosite.dat 和 geoip.dat 放置在 /usr/local/share/v2ray/ 目录下”。但是我用“where”命令并没有找到这两个文件。所以需要自己下载
于是在 Github Releases 下载适用于 macOS 平台的 ZIP 压缩包,解压后里面有相应的资源文件,即以.dat结尾的文件。(同时还有v2ray可执行文件,因为已经下载了v2ray,该文件可以删除)
将资源文件放在电脑上的某个目录下即可
3 配置客户端
-
首先打开
首选项,找到内核设置部分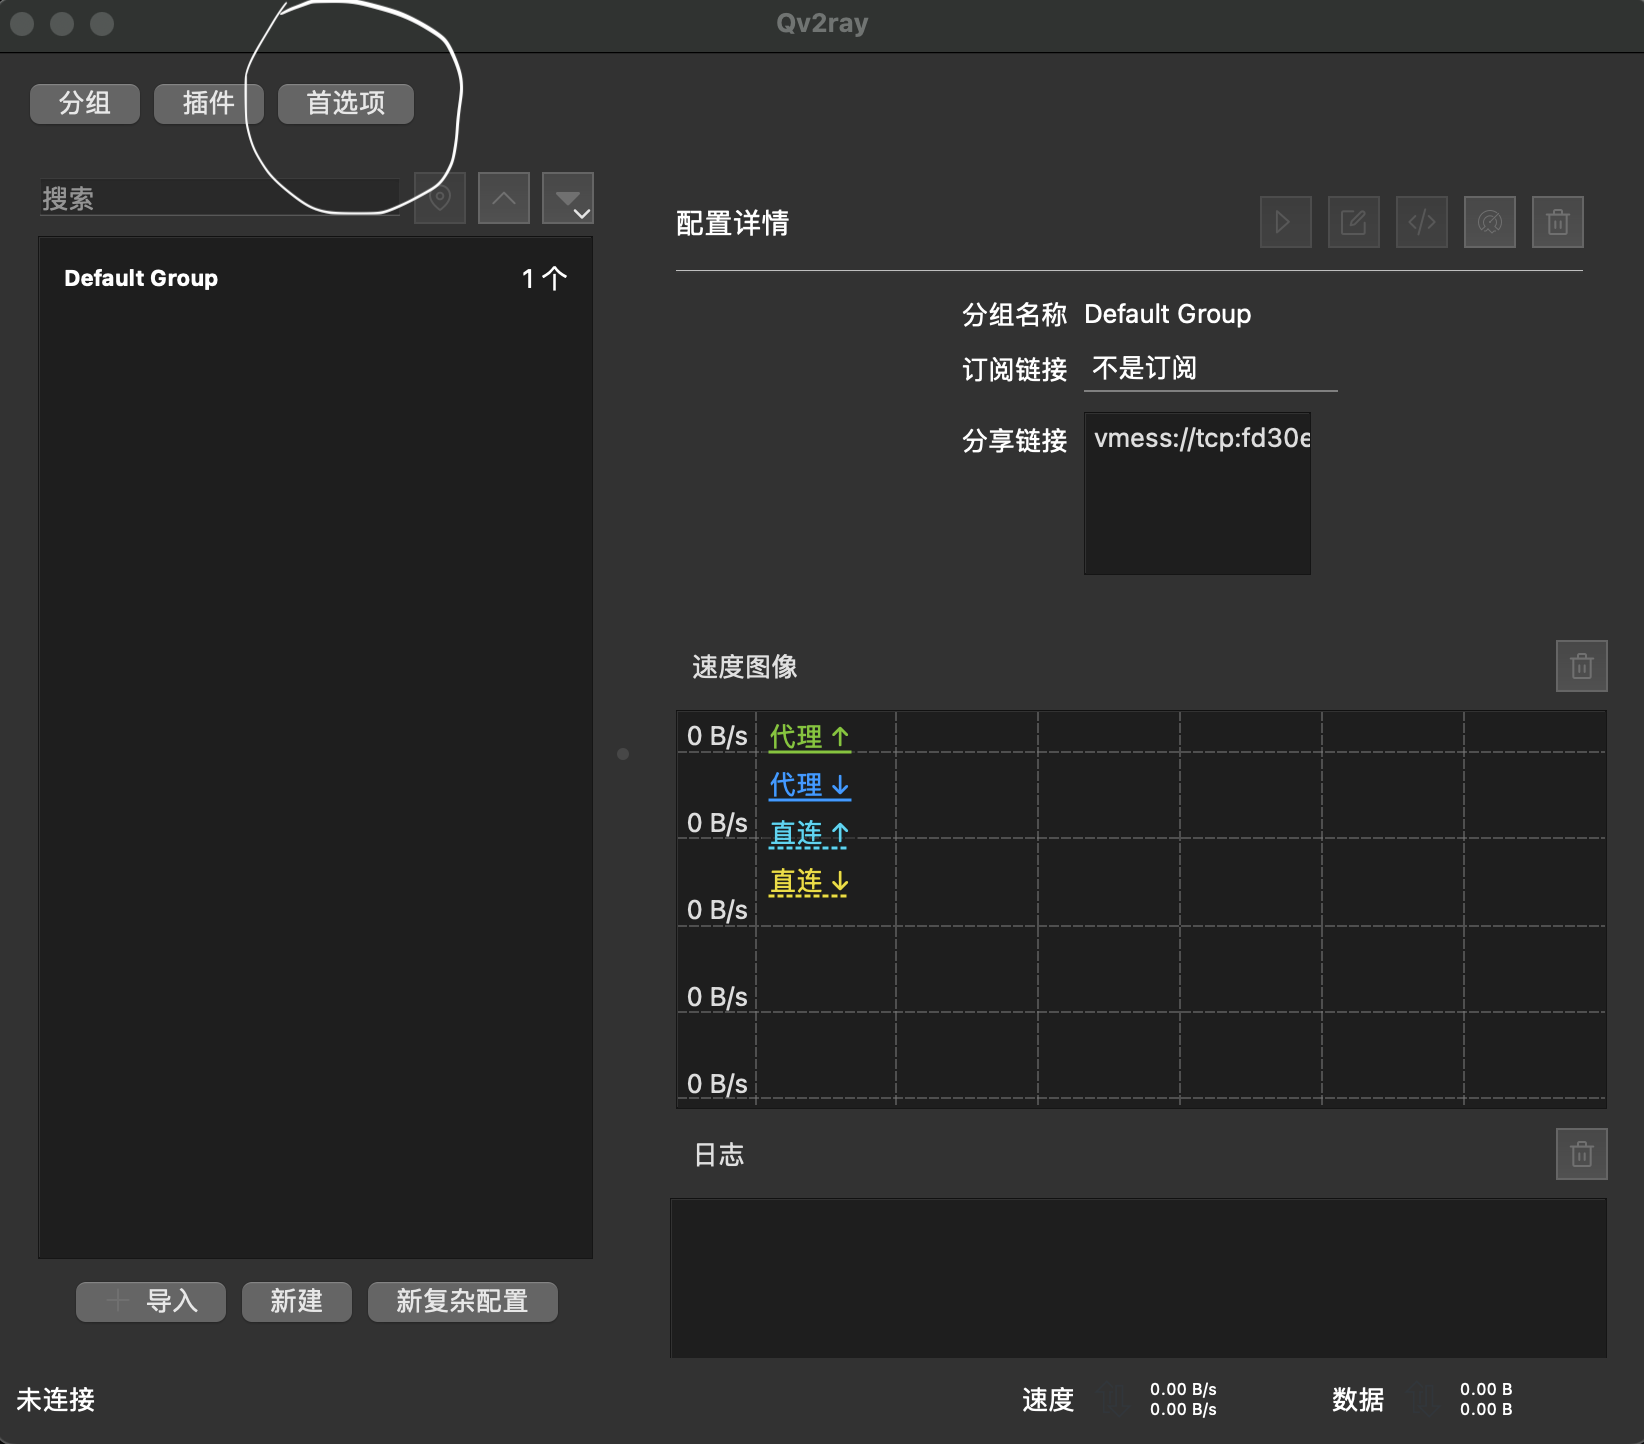
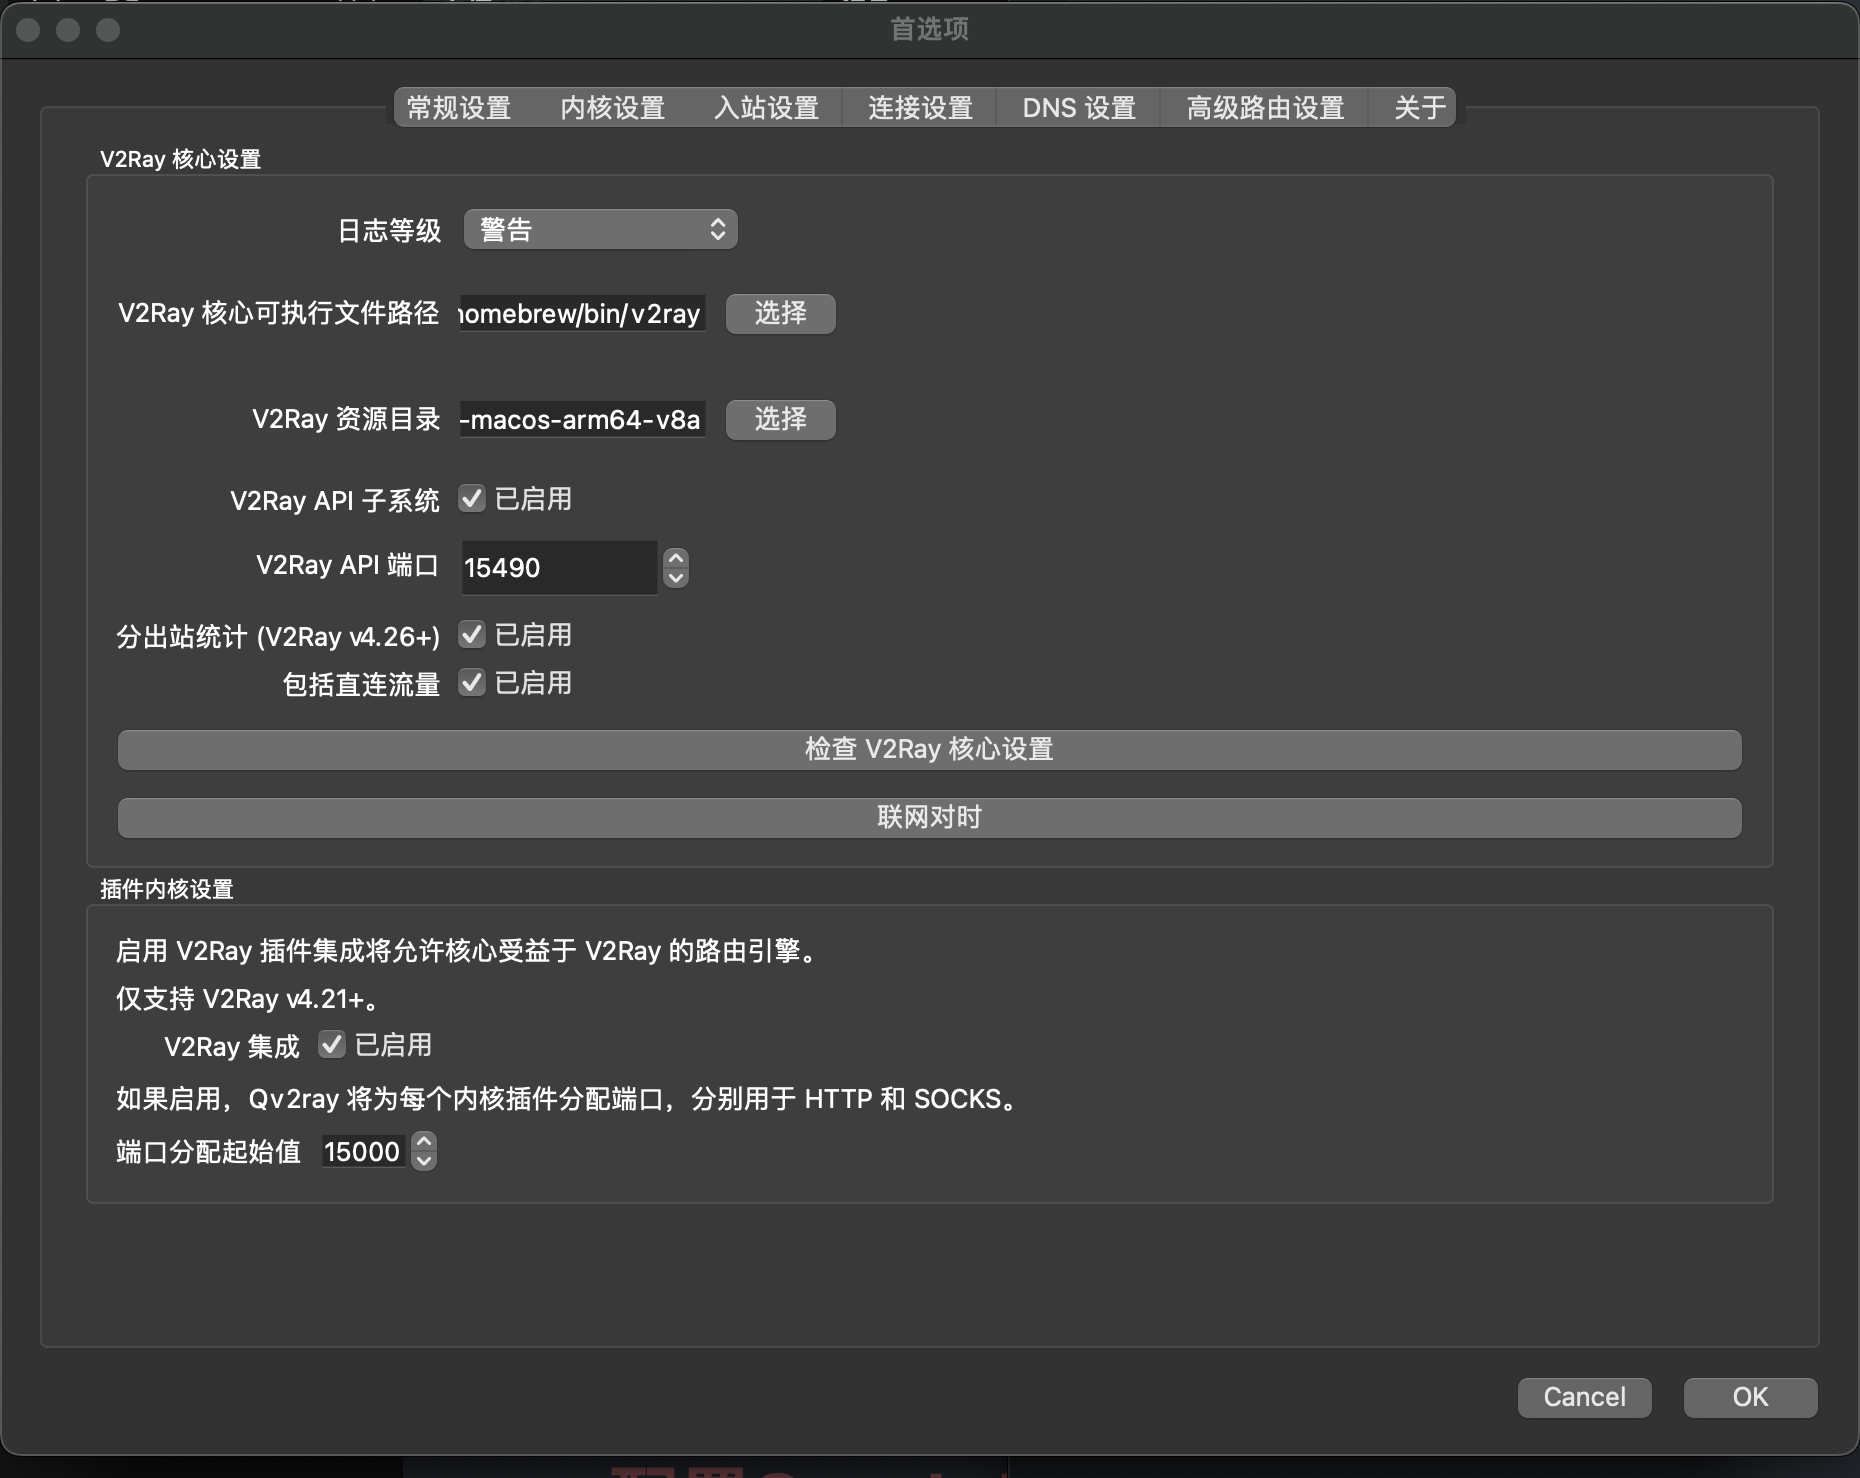
这里需要修改两个地方,一个是v2ray核心可执行文件路径,将这里修改成第一步里命令行得到的路径。第二个是v2ray资源目录,将这里修改成第二步下载的文件夹的路径。然后点击检查v2ray核心设置
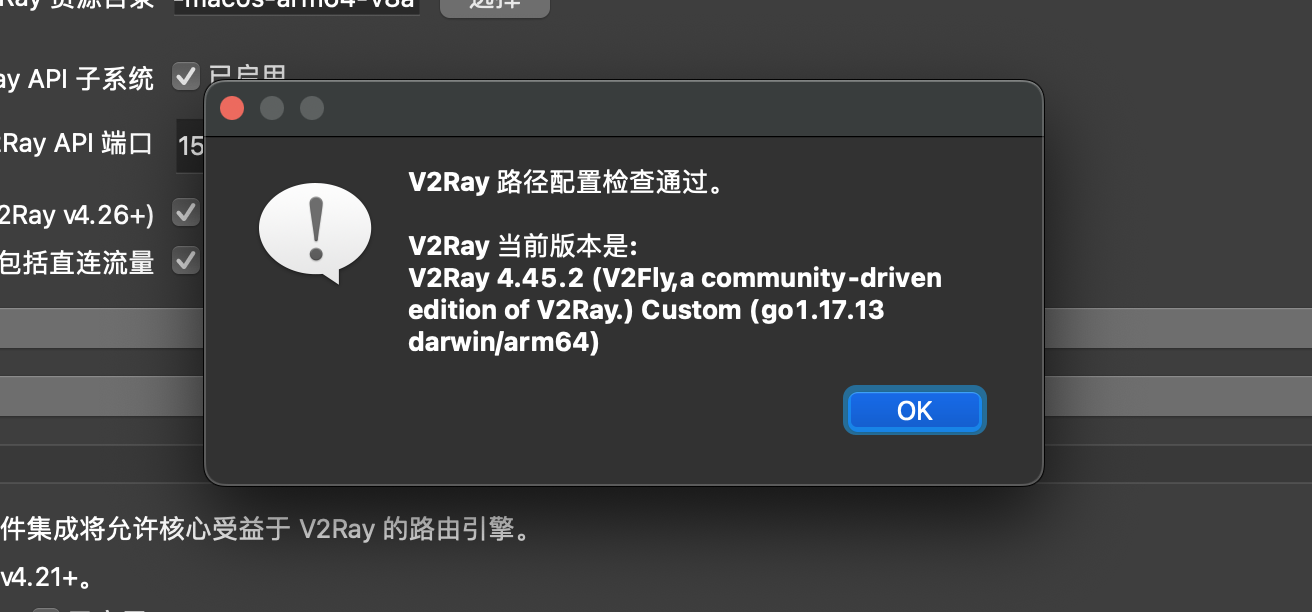
得到如上提示说明设置成功。如果是其他提示则说明设置有误,需修改直至设置正确。
-
添加服务器信息
设置好之后,在主界面点击
新建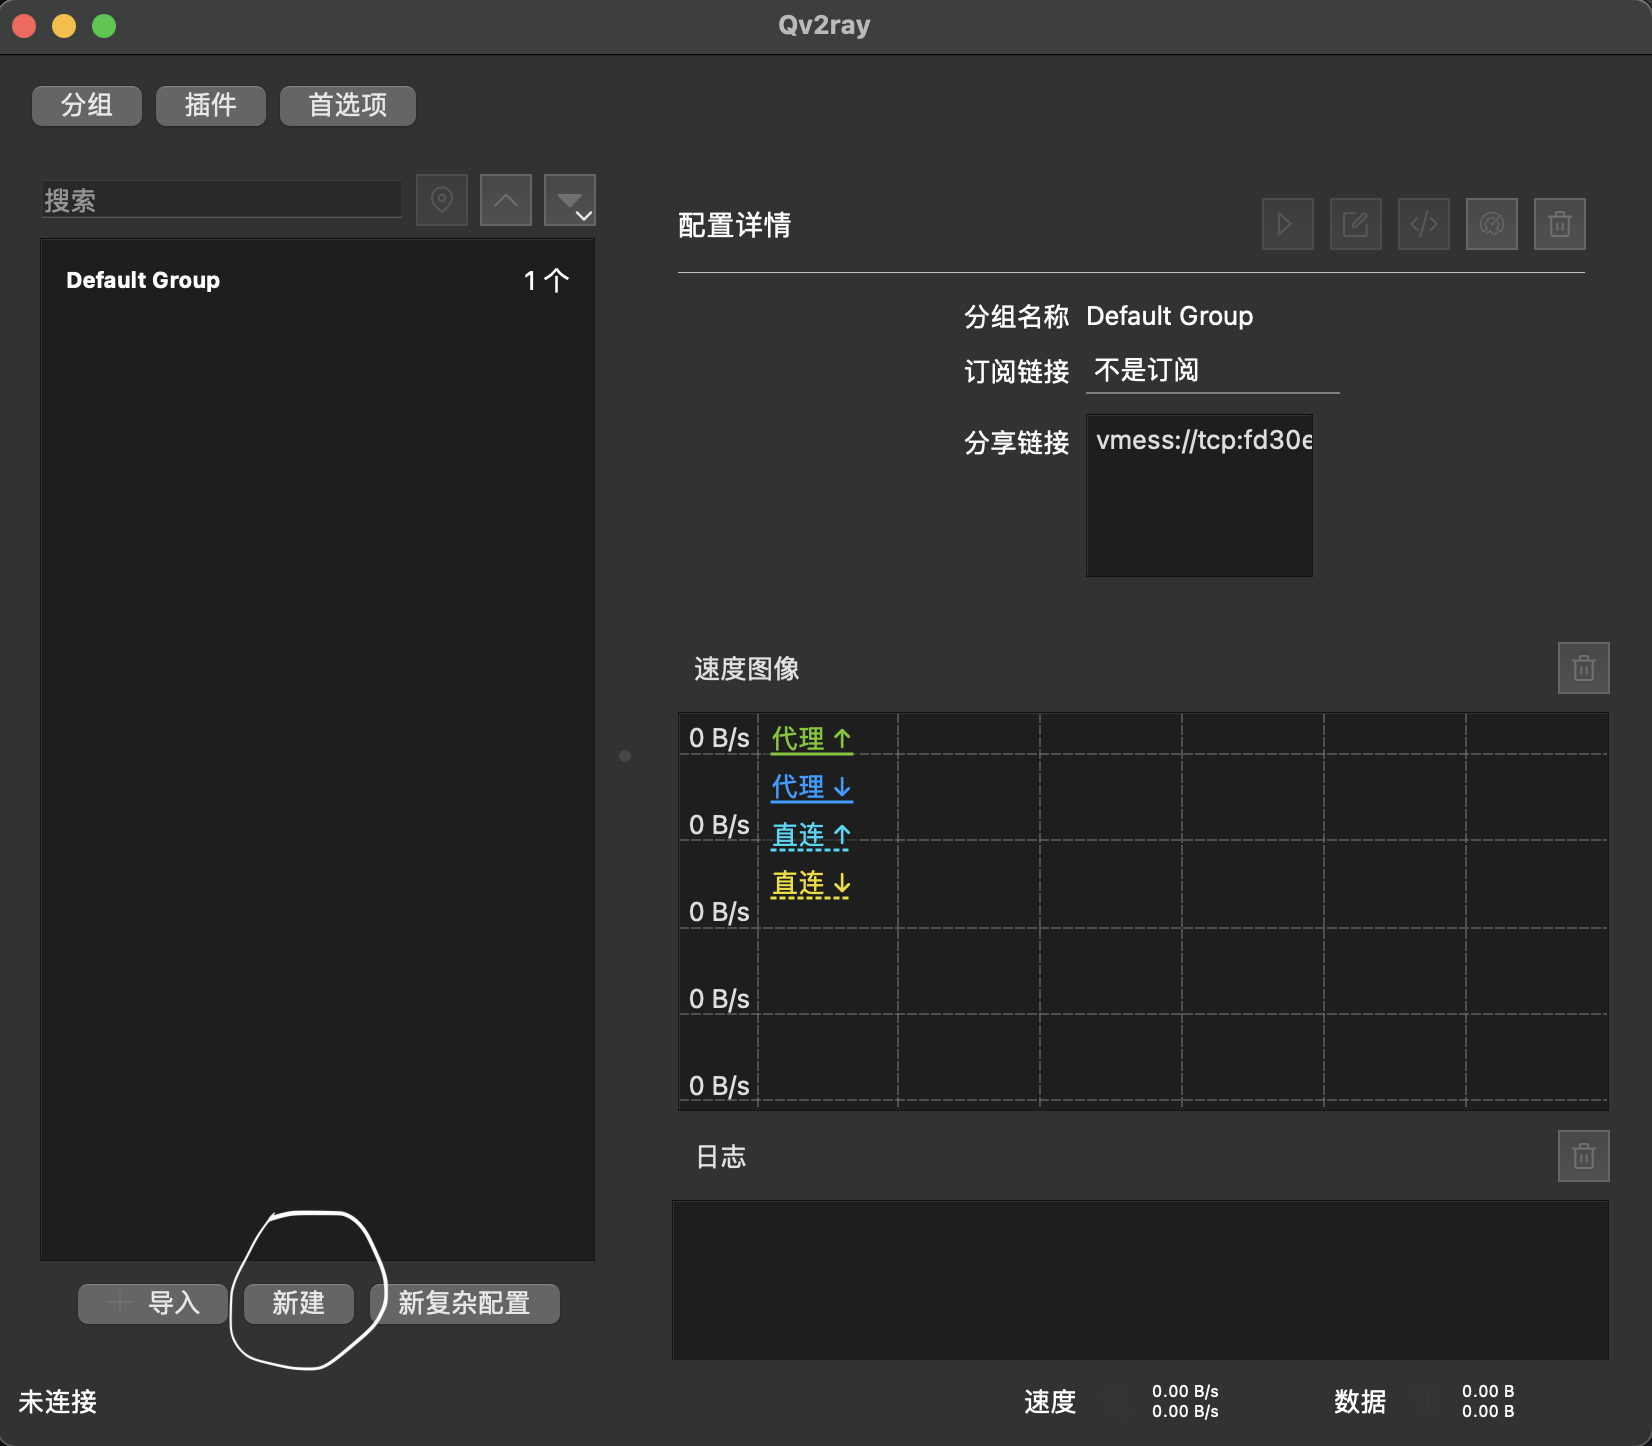
会出现如下界面
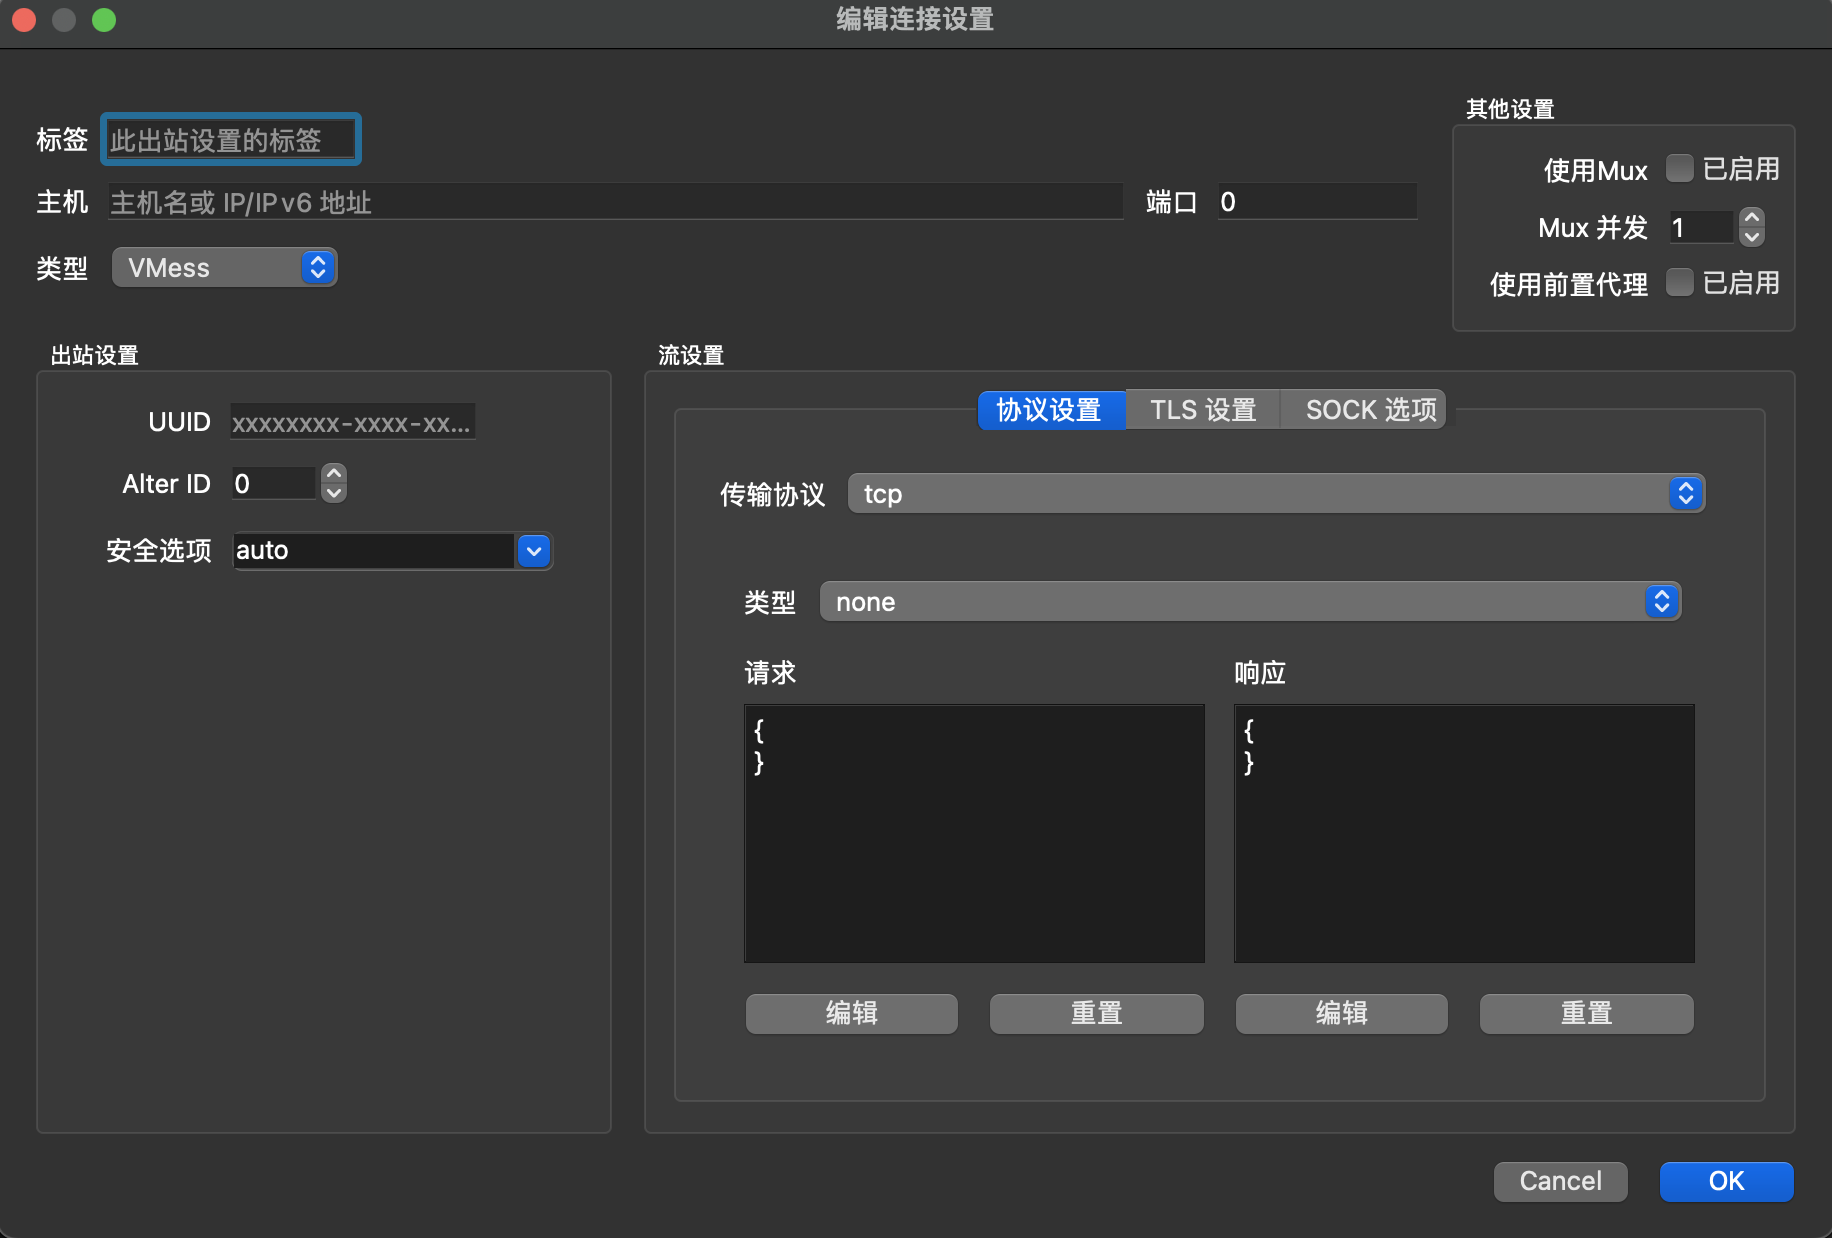
-
随意填一个标签
-
主机写自己主机的ip地址或域名(如果有的话)
-
端口填写自己在服务器上config.json里配置的端口
-
类型就是VMess
-
uuid填写自己在服务器上config.json里配置的uuid(即id)
-
Alter也与服务器上配置保持相同即可,保持默认也无所谓
-
安全选项保持默认auto即可
-
传输协保持默认tcp即可
其他均不需修改
修改完成后点击ok保存
这时候主界面就已经有自己的配置了
-
-
运行
选择相应配置,点击
连接即可
连接成功后,可以打开YouTube试试是否可以科学上网。如果可以打开,则说明配置成功。
5 安装配置V2Ray客户端(Windows)
这部分可以参考这个教程
三、 结局
这是一个悲伤的故事,刚搭好后,用起来很爽。结果没过几天突然用不了了。在https://port.ping.pe上测试了一下tcp通信是否顺畅,发现所有来自大陆的请求都失败了。极大概率是IP被ban了。没想到被封的是如此迅速。
大家自己搭建V2ray的话,一定要选择可以更换ip的服务器提供商,比如Vultr。或者可以尝试V2Ray+TLS翻墙以及V2Ray+TLS+BebSocket的方式。这些我没有试过,大家可以自己找一下教程。